Samsung G9 Monitor Black Screen Fix: No OSD, Thermistor Removal
Samsung G9 Monitor Black Screen Fix: No OSD, Thermistor Removal
Author: Lance Wright II
Published: 7/11/2025
This guide is not a feel-good walkthrough. It’s not a tutorial on pressing the right key combo or plugging in a different cable. This is your last-ditch, potentially dangerous, physical hardware fix, and if you’re here, it means you’ve probably exhausted every other option.
You’re not crazy. This is a real issue.
My Story (And Probably Yours Too)
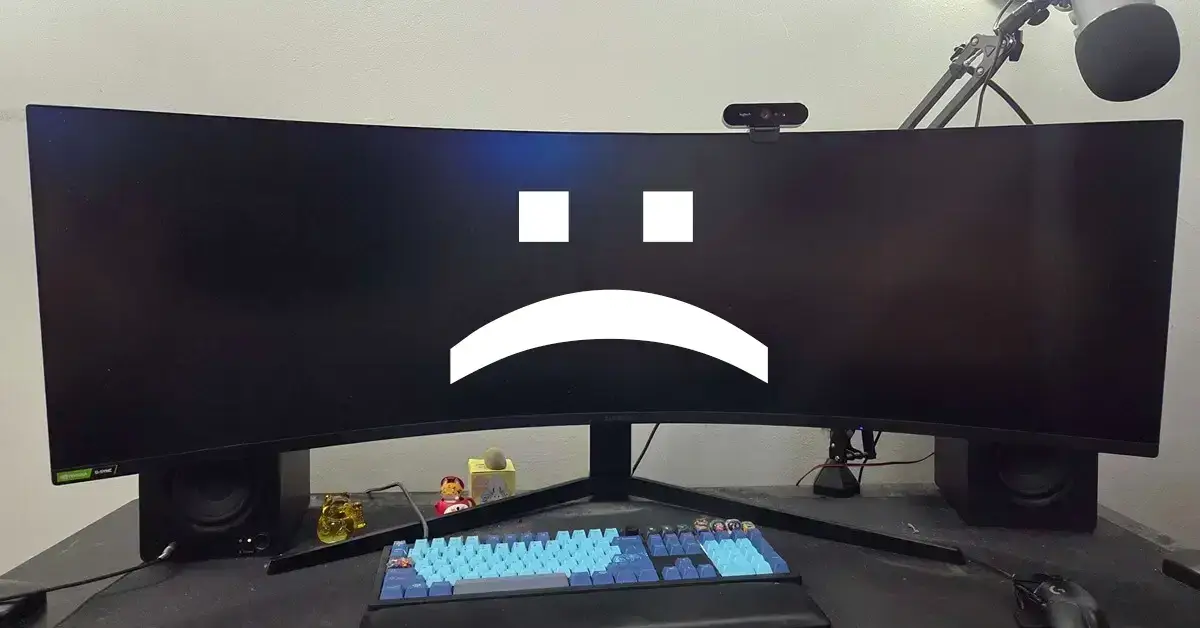
This problem usually appears after an extended period of time when the monitor falls asleep, like when I go on vacation. I'd come home to find the screen black but glowing, with no signal and no OSD, no menu options, no input display, yet the PC still recognized the monitor.
Over time, I learned some tricks. Sometimes unplugging and re-plugging the monitor a few dozen times would work. Some tricks aren't worth mentioning as it was likely just coincidence as I would perform my barbaric voodoo ritual.
But there was one instance I remember vividly. None of the tricks worked. I honestly thought my monitor was dead this time. I spent the night packing up my monitor and researching new monitors to purchase.
That night I didn't want to buy a new monitor just yet. Nor did I know what to do with my broken monitor. I was tired, it was late at night, so I decided to just go to sleep and figure it out the next day. I had already packed the everything into its original box, fully convinced it was a lost cause.
But the next morning, for no real reason other than desperation, I took it back out and plugged it in again. And magically, it worked.
That’s when I learned something crucial: leaving the monitor unplugged long enough (8–24+ hours) to let every bit of power drain could sometimes reset it.
This fix would work for me a few more times, which continued to extend the life of my beloved monitor. But I always knew there would be a day this would no longer work. As the issue became more frequent. As small hiccups would cause my heart to drop, as I wondered, "is this the time it dies?"
But my most recent vacation, a 6-day trip, became the day I always feared. You don’t deal with this bug repeatedly without dreading the moment your trick finally stops working.
And this time? Nothing worked. Not 8 hours. Not 24. Not multiple cables. Not HDMI. Not holding the power button. Nothing. The doomsday had finally arrived.
The Rabbit Hole
So I went digging again. I found this legendary Reddit thread:
widescreen gaming forum reddit post
Which this thread was packed with a significant number of users sharing the identical issue with the Samsung G9 series monitors. Each user had their own voodoo magic dance they'd perform to get it to work again. Some claimed HDR fixed the issue, some thought it was their GPU, some thought it was the monitor firmware, and over and over everyone had different solutions. Some solutions worked for others, but none had long term confirmed success.
Not until I found a comment by djbkwon who found a fix, but then came back to his comment to add an update. He confirmed the fix was temporary and wasn't permanent. Then he'd update again leading me to this post:
Thermistor fix reddit post
Users like "alphanimal" and "djbkwon" shared their discovery:
The problem was the thermistor on the T-Con board.
What’s a thermistor? It’s a simple temperature sensor. The G9 uses it as a thermal failsafe, if the board gets too hot, it shuts the panel off.
But the flaw? It’s overly sensitive, poorly placed, and prone to misfiring after long idle periods (like a vacation). When it triggers, it locks the monitor into a black screen. No menu. No signal. No wake-up call.
The user alphanimal who originally started this reddit thread would even try cooling the thermistor with an ice pack, and the display worked temporarily! Others, like me, discovered that full power drain (6–12 hours unplugged) sometimes helped.
But the real fix?
The Thermistor Removal Fix
Removing the thermistor entirely, physically disabling it, tricks the T-Con into thinking everything’s cool (literally). The panel boots. The OSD works. The signal returns. The monitor lives again.
Multiple users confirmed it. I tried it. It worked.
But here’s the big warning:
This fix is permanent. It physically alters your monitor. It removes thermal protection from the T-Con board.
It’s not for the faint of heart. But it’s not as dangerous as it sounds either. You’re not disabling safety for the whole monitor. Just the T-Con’s overly aggressive shutdown logic. And under normal use, the T-Con doesn’t overheat.
That said, you should only attempt this if:
- You have no OSD
- You’ve tried all unplugging tricks
- You’ve unplugged everything and waited overnight or longer
- You’ve tried HDMI/DP cable swaps
- You’re out of warranty
If all that failed, and your symptoms match mine, this guide is for you.
Other Variants and Theories
Some users with G7 monitors report similar issues. I can’t confirm if the same fix works, but a user referenced this teardown video showing the thermistor on the G7:
Click here for Youtube Video
Note: I have reached out to multiple reddit users of G7, G8, and G9 series and those with varying T-Con board types. I've not received any responses, but if I gather additional information. I will update this guide to be more compatible to more than just the G9 series.
There’s only one post I found claiming this fix made things worse, but they didn’t provide enough detail to be sure. It’s likely they broke something else during disassembly. I'm not saying, there's not additional users saying it didn't help or made it worse, but from my research, I only found one.
Some in the how i fixed my monitory by removing a thermistor reddit thread reported having different PCB's as well. My monitor and this guide goes over the G9 series specifically. My exact model is the LC49G97TSSNXDC. If you don't have a similar series, be sure to check out the original reddit thread as tons of information was shared. But those who have a G9 series monitor, you very likely have an identical T-Con board. As the T-Con boards are manufactured to be re-used between models.
But nearly everyone I found who had all these issues exactly and then proceeded to remove the thermistor, would end up reporting a success story. Myself included.
Share Your Story
If you had a different board, a success or failure story on this topic, or have relevant information that'd be helpful for others. I created this guide purely to help others in my exact situation. If you have images showcasing different boards and where the thermistor is, or anything else. I'd love to hear your story so that I can update this guide and help others too. Feel free to send me a message on my LinkedIn profile here, just be sure to tell me in the request that you're connecting for this reason :)
Or if you want to DM me on Reddit instead, you can messaged my Reddit Account Here.
Sharing is caring my friends.
But I truly didn't discover any of this. The real work is by those I cite in this article. The users who shared their experience on reddit, those who're knowledgeable of PCB's. They did the real work.
Thank you to everyone who shared their findings on the internet. Without you, many others, myself included, would have thrown away a perfectly fixable, very expensive monitor.
Why This Issue Matters
This is a design flaw, a known, widespread, unacknowledged one.
It doesn’t show up in the first year. It creeps in. It starts as a glitch. Then a routine. Then a curse. Until finally, it bricks your monitor just out of warranty.
This guide is here for that moment. The moment you know it’s not your fault.
The moment you realize this is fixable.
Next: the actual disassembly and thermistor removal guide (with photos, steps, and tools). But read this intro first. Understand the risk. Understand the symptom. And know you’re not alone.
This saved my monitor.
It might save yours too.
How to Fix the Samsung G9 Monitor Black Screen (Thermistor Removal Guide)
Before You Start
This guide involves opening your monitor and physically altering the internal hardware. If you're not comfortable with this, stop here and consult a professional. Proceed at your own risk, but if you're like me, you're probably desperate and ready to dive in.
Also: this thing is big and heavy. I strongly recommend having a friend or significant other help you, even if it’s just to hold things in place. I had my fiancée help me, and it made all the difference.
Step 1: Prepare a Safe Workspace
Place the monitor screen-down on something soft and cushioned like a futon, couch, or padded workbench. You want to avoid pressure on the curved screen.
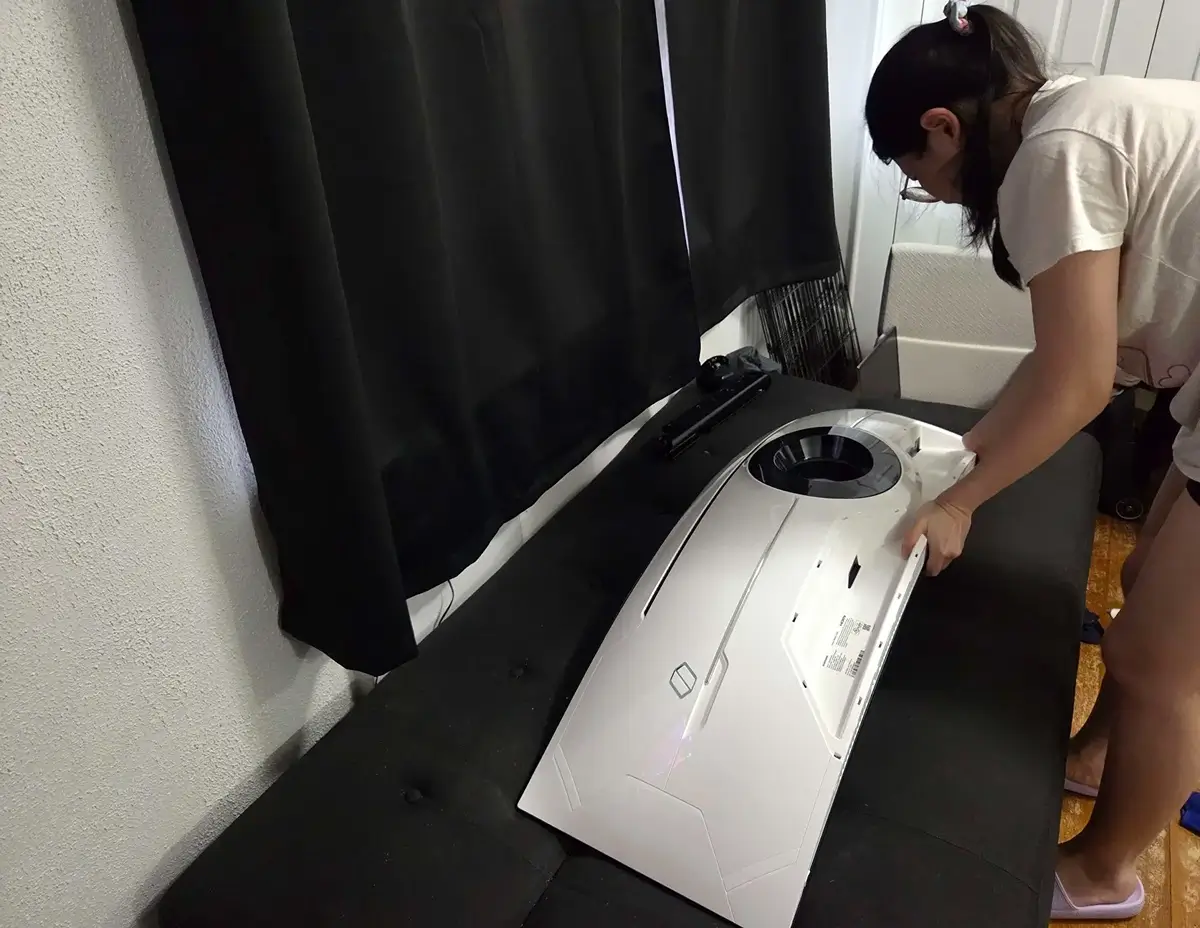
Make sure you have enough room to maneuver around, and don’t forget: this is an expensive display. Be careful not to crack it while trying to fix it!
Step 2: Gather Your Tools
You don’t need a fancy kit, but here's what I used:
Tool | Use |
|---|---|
Long Phillips screwdriver | To remove the arm bracket |
Small precision Phillips screwdriver (PH1) | For internal screws |
Plastic spludgers (triangle picks) | To unhook the back panel clips |
Flat metal pry tool (wedge style) | To release proprietary side clips |
Tweezers (optional) | For removing the thermistor |
- Note: You can use an old credit card or guitar picks as well instead of plastic spudgers.
Optional: I used the STREBITO Electronics Repair Kit
Amazon Link
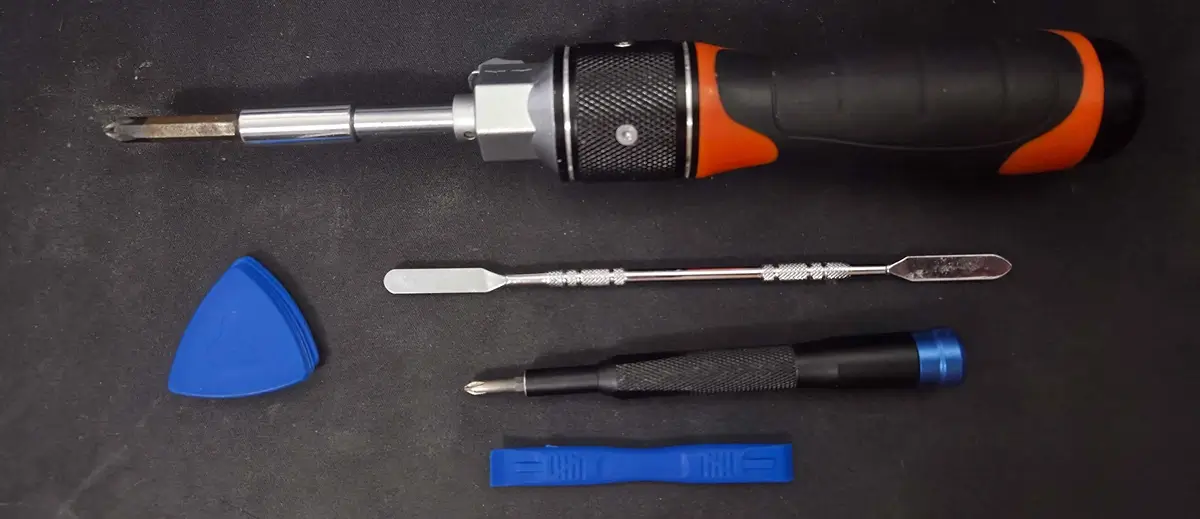
This image shows the 5 tools I used. Though you can use household alternatives in most cases.
Don’t worry if you don’t have a kit, a couple of screwdrivers, a plastic card/guitar pick, and tweezers will work in a pinch.
Step 3: Remove the Arm Bracket
If it has been a while, removing the back arm might trip you up. Samsung's support manual can help, but I found this YouTube video by No Waffling far more helpful:
The video shows this step better, but where you see the circular plastic piece around the bracket. You can turn that counter clockwise to unscrew it, then pull it apart. Then you'll be able to clearly see the screws for the bracket. Unscrew the 4 large bracket screws using your long screwdriver.
Set the bracket and screws aside.
Step 4: Pry Off the Back Panel
This is the most frustrating part, but you got this.
Start at the bottom
- Locate the small indentations where plastic clips are hooked at the bottom of your monitor. Bottom of the monitor referred to where your ports are located.
- Use your plastic spludgers or guitar picks to slide between the seams and pop the first set of clips.
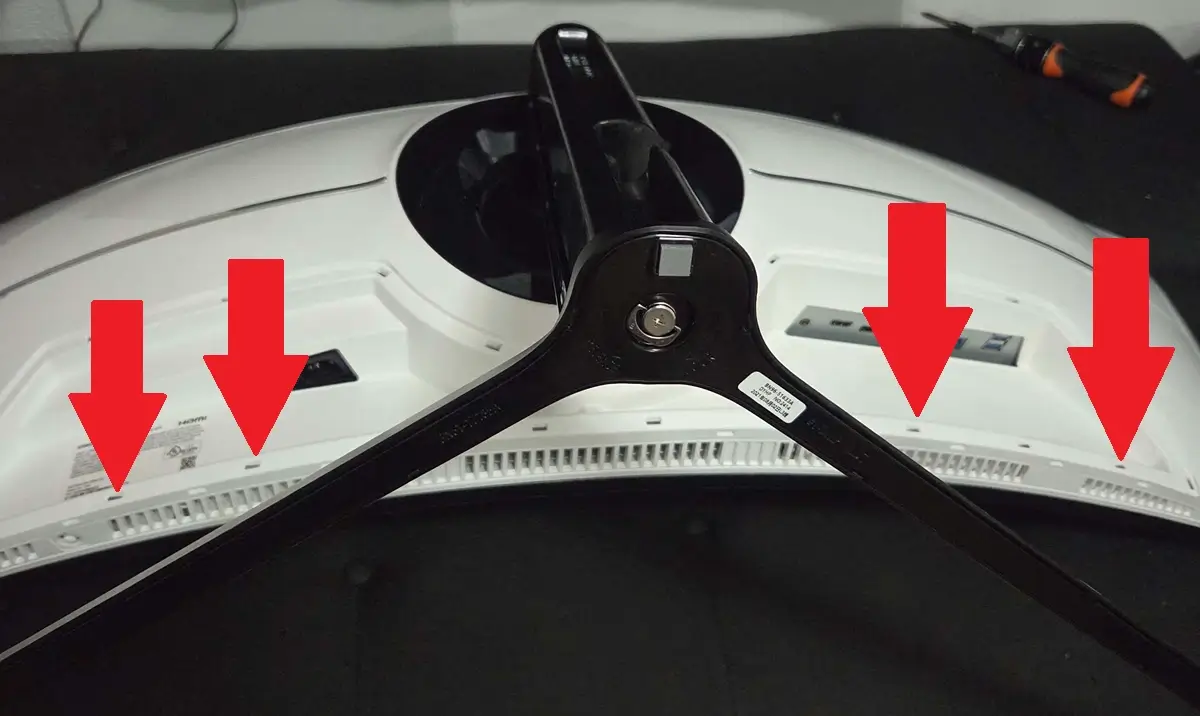
Move to the sides
- Now do the same thing with your tools on the right side to slide between the seams just enough to fit a flat pry too or long screwdriver inside starting at the bottom right corner. There's clips deeper into the sides, so you'll need to use the length to reach.
- Use your flat pry tool or a long screwdriver to start from the bottom-right corner.
- Carefully trace upward, keeping pressure. You’ll hear two distinct "pops", these are the special clips Samsung uses to keep the back closed.
- Then when you guide your tool to the top right corner, begin to guide your tool from that corner to the center of the monitor. You'll hear 3-4 "pops" as the top clips unhook.
- Repeat this process on the left side of your monitor doing the same thing. You'll hear the pops and the entire back will begin to unhook.
This takes patience and slow, steady pressure.
If you want a visual demo, I recommend this teardown guide:
Once the last clips are popped, the back panel will lift away, victory!
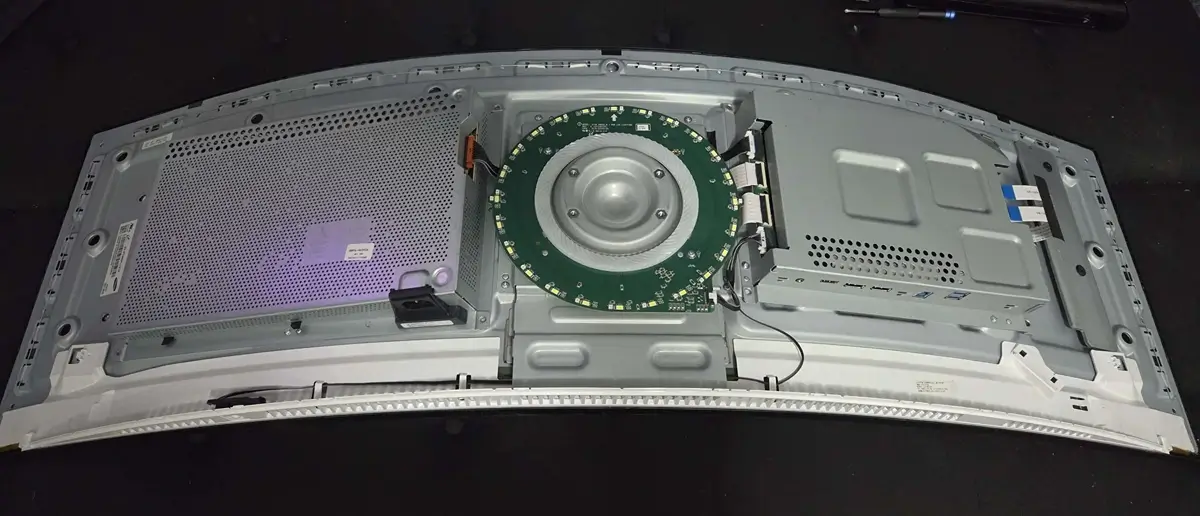
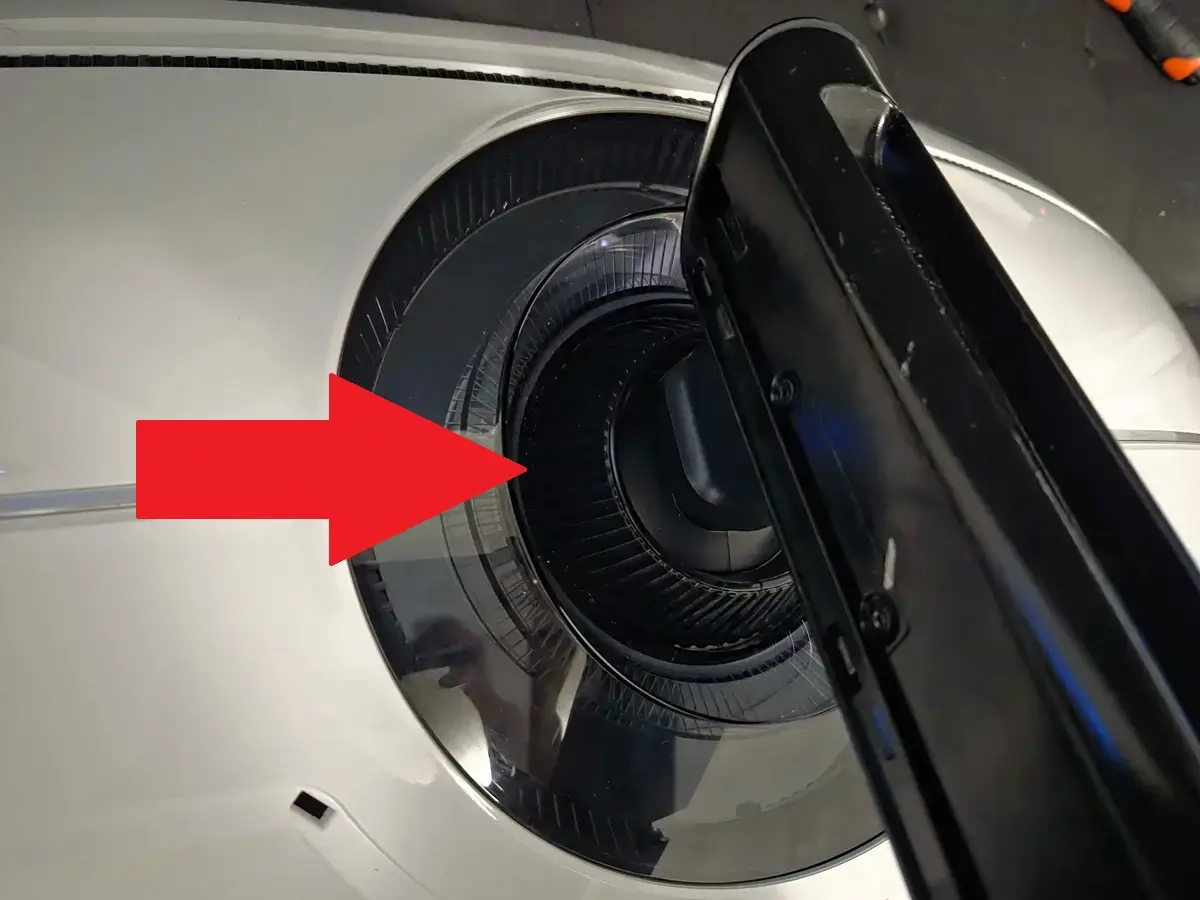
Step 5: Access the T-Con Board
With the back off, you’ll see a circular green board with 6–7 screws between the green board and the metal shield underneath. These hold the shield and T-Con area underneath.
- Remove all visible screws.
- Set the board aside (you don’t need to unplug the cables).
- Lift the metal shield panel underneath straight up, do this gently and evenly. It may resist due to a thermal pad.
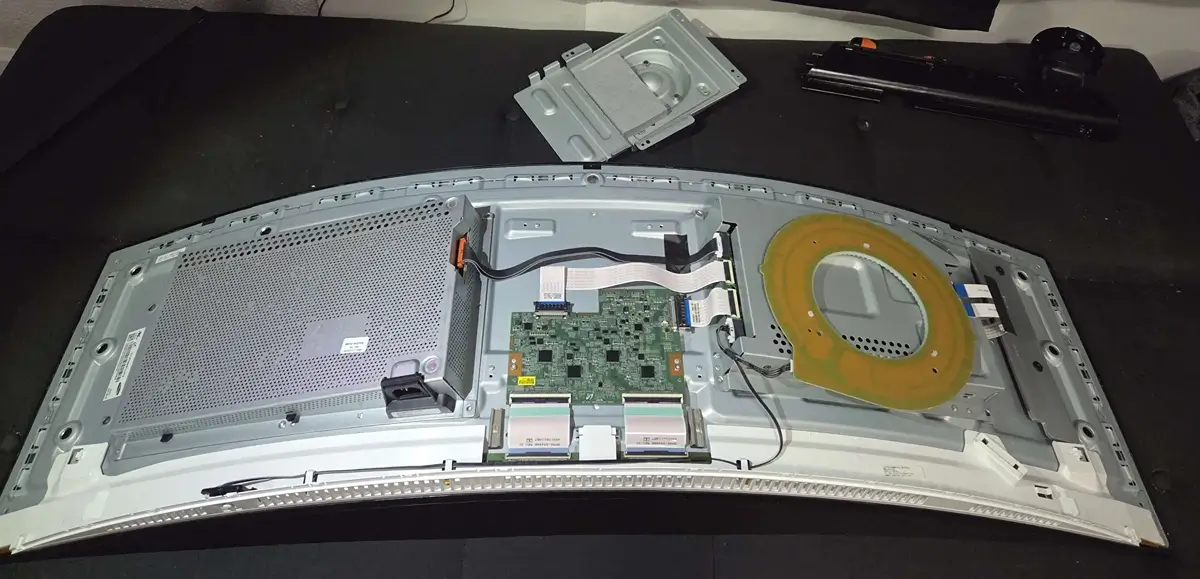
Do not touch the thermal pad, just keep it face-up in a clean, safe place.
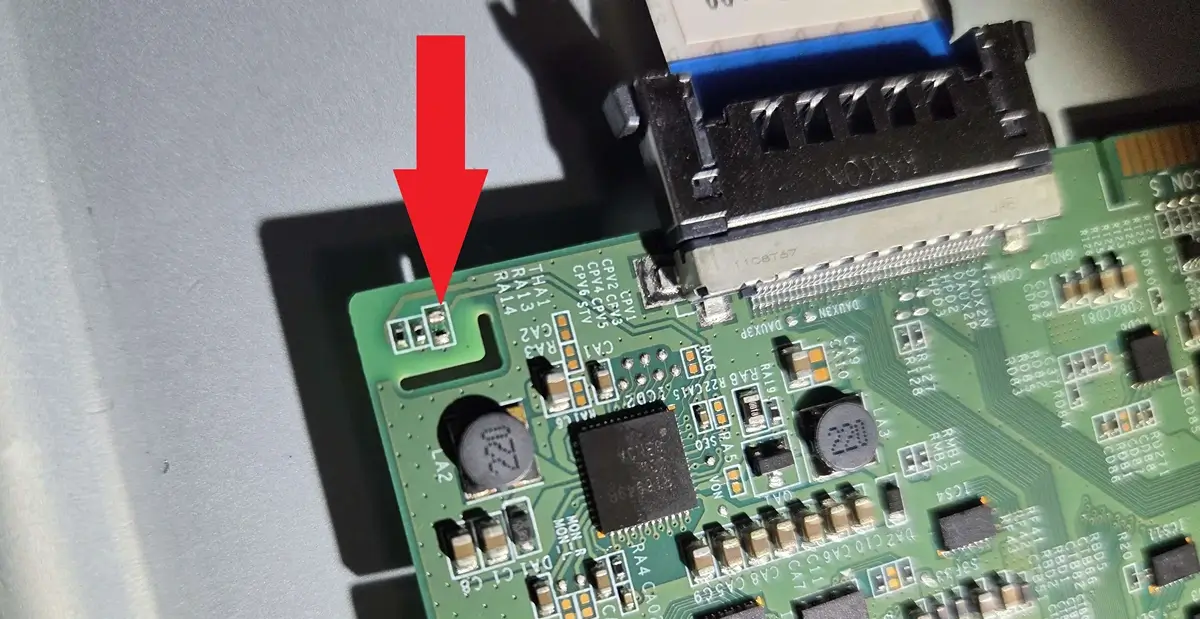
Step 6: Identify the Thermistor
You’re now staring at the T-Con board, and you should see the thermistor, a tiny component labeled THA1, near test points RA13 and RA14.
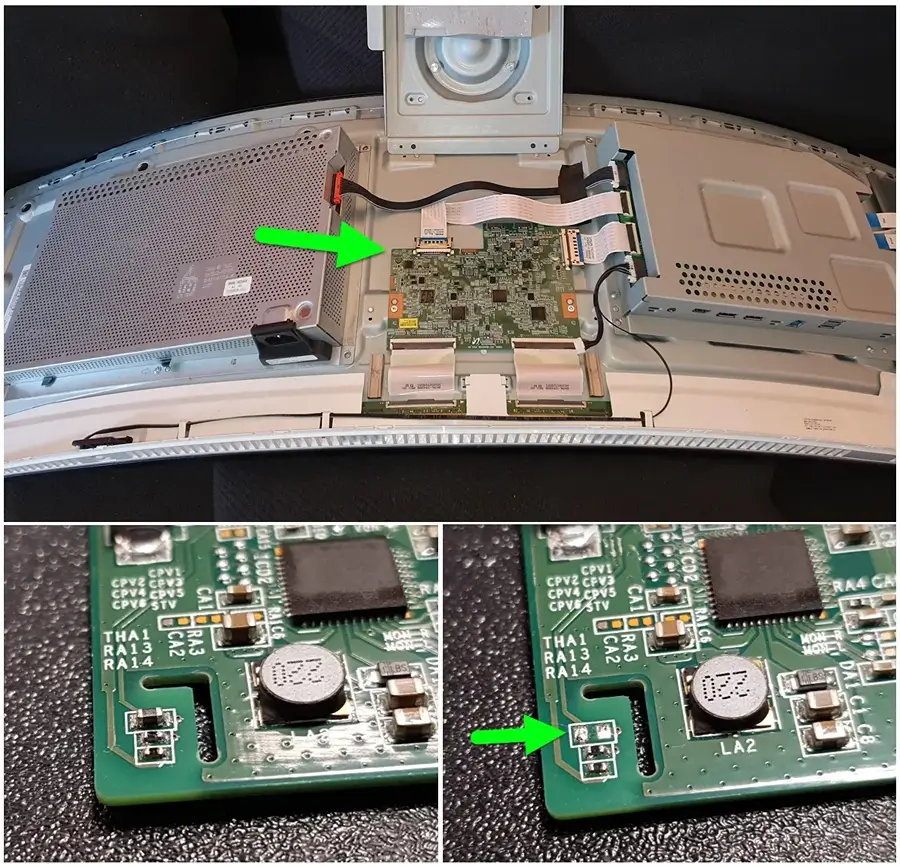
(Image credit: Reddit user alphaanimal – very high-quality image)
This little guy is the reason your monitor won’t turn on. It fails and tells the monitor to go dark. Let’s deal with it.
Reminder: If you don't have an identical PCB, be sure to do your research! Do not just break random parts of your board or you could cause irreversible damage.
Step 7: Remove the Thermistor
You’ve got two options:
Option 1: Solder Removal
Best for advanced users. If you’re confident with soldering, you can desolder the component and cleanly remove it. This also makes reversion possible. But I only suggest this if you're very confident. For example, I have soldered a few times in the past, but I'm a novice. This is a perfect example of an instance where you can cause more harm by soldering this incorrectly!
Option 2: Manual Break-off (Beginner-friendly)
Here’s what I did:
- Use narrow tweezers to gently grip the thermistor.
- Slowly wiggle it side to side. Be patient.
- I gave the tweezers a light tap with the back of a screwdriver while pinching the thermistor which popped it off cleanly.
This method requires finesse, not brute force. You just want to sever the connection, the solder isn’t super strong, but don’t rush. You can see from the image that once broken off, the 2 sides are no longer connecting to one another. This is a success!
Step 8: Reassemble the Monitor
You're nearly done!
- Place the metal shield back, aligning with the thermal pad.
- Screw the green circular board and metal shield back in place.
- Reattach the back panel, pressing around the edges until you hear the clips snap in.
- Screw the arm bracket back on.
Step 9: Power It On!
Moment of truth:
- Plug the monitor in.
- Look for the screen to light up and display the input source message.
- Navigate to the monitor menu and select your correct input.
If all went well, your desktop should appear, and you’re back in business!
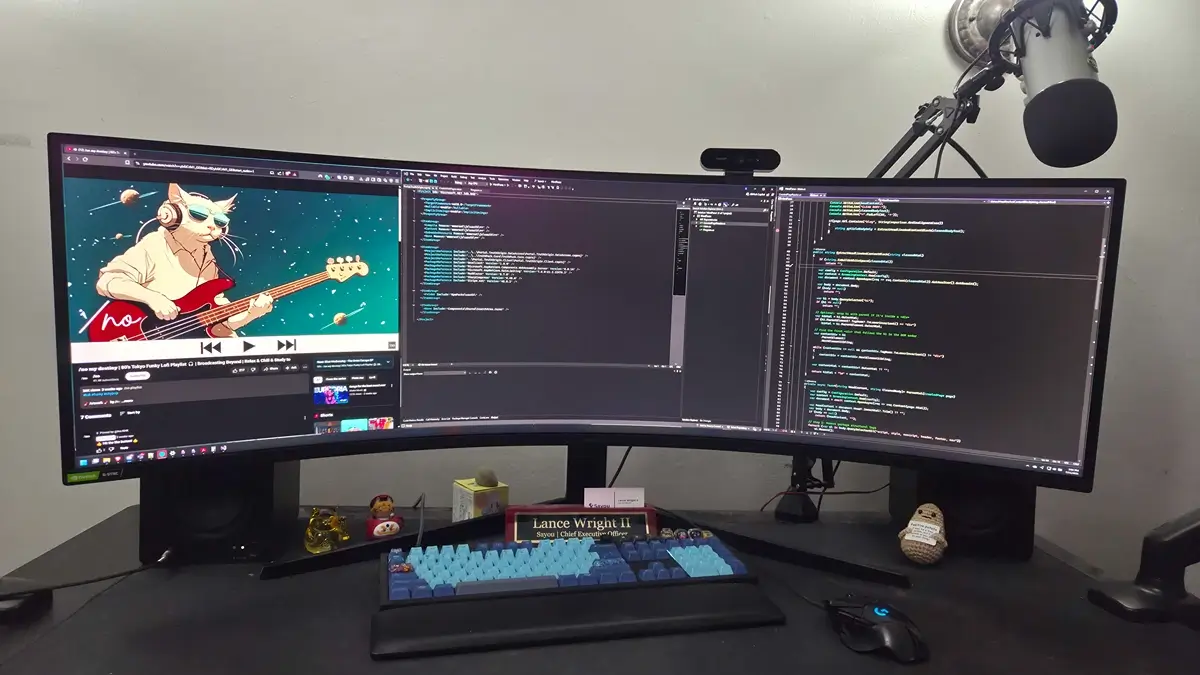
Look at that big beautiful monitor back in action! All 49 inches of territory at my disposal once again. And hopefully for you as well.
Final Thoughts
I hope this guide helped you. I genuinely do. Because I had no motive for this guide other than to provide the help and guidance I wish I had. This monitor was a Christmas gift from my fiancée years ago. Though the screen having this quirk was terrible and scary, I do love my monitor.
As a developer, my monitor space is critical to my daily routine. I'm spoiled, and I just can't survive anymore on 1920x1080 monitors. I have tried so many things over the years. But I'm glad that I ran into the reddit threads that I did. I'm so happy that this was the solution to my problem.
But I never would have physically altered the PCB unless it was my very last resort. You should feel the same. As I am not familiar with altering PCB's and couldn't have done it without those mentioned in this guide.
If this helped you, go give some love to the reddit thread where the discoveries were truly made. Show appreciation for the real ones ;)
I didn't discover anything, I merely put the pieces together and built a guide around what others have so generously shared.